Know Your Makeup Brushes
The most basic mistake a makeup artist or a makeup lover generally makes is to spend a good amount of money on makeup and use poor quality brushes or tools to apply it.
A good makeup brush helps to create a flawless and airbrushed look. However, a wide range of brushes available in the market can make the buying process a bit intimidating. Using the warmth of your finger to melt and blend the makeup into the skin is a tried a true way to apply foundation, but if you want to become a professional makeup artist then you need to arm yourself with the right knowledge about makeup brushes.
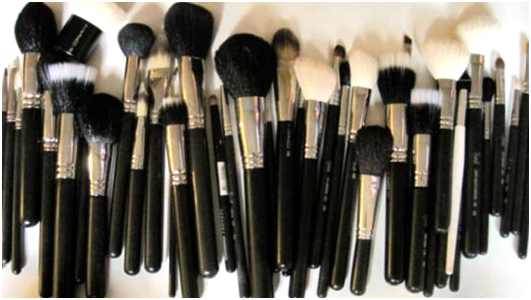
Makeup brushes not only come in wide range of sizes, but they also come in different materials, lengths, bristle shapes and density.
The two most popular materials in which the makeup brushes are available:
1. Synthetic hair brushes
Synthetics are man-made brushes that are either made of nylon or polyester filaments. They can tapered, tipped and flagged as per the requirement to ensure correct pick and placement of colour. Synthetic brushes are used in the application of creams, liquids and gels. These brushes are densely packed and used in heavier application, like a foundation brush.
2.Natural hair brushes
Natural hair brushes are normally made of squirrel, badger, pony and kolinsky hair. They are hand stacked in place for various shapes and sizes and are generally used for application of powders. They help in application in soft layers and in gradually adding colour and definition, like blush or eyeshadow brushes.
A perfect brush set helps to not only save time in creating the right look but also to achieve a diverse range of looks. The key to makeup is blending, and to achieve the perfect blended look you need decent makeup brushes. Each brush in makeup is made to do a specific task.
So, we at Brush Up by Vanshika have distilled the options down to the most useful tools.
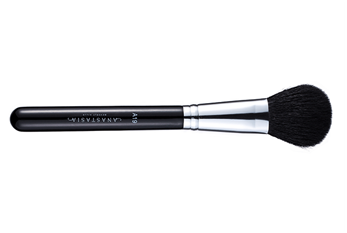
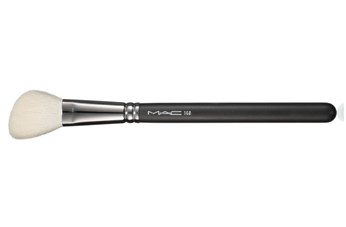
1. The Powder Brush
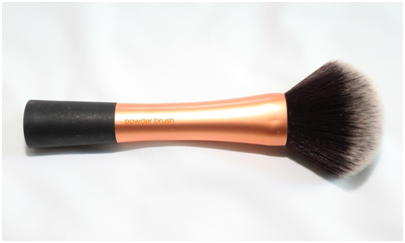
A powder brush is generally a thick and full fibered brush. It can be either synthetic or natural and has the versatility to perform a multitude of beauty jobs. Powder brushes are best used to disperse powders over the face to set the makeup in place. They are also well-suited for adding colours like blush and bronzers in a diffused form. This tool is a must have in your makeup kit.
How to use a powder brush:
Use the fluffy bristles of the powder brush to pick up a fine layer of loose powder and dust it over your T-zone and under your eyes to set the makeup or load up the product to bake your makeup.This brush is also perfect for adding a touch of shimmer to shoulders and collar bones as they easily cover large areas.
2.The Flat Foundation Brush
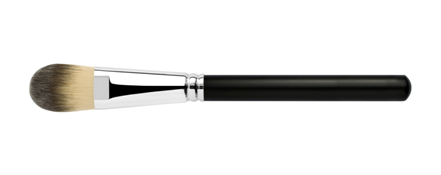
A flat foundation brush is used to apply liquid or cream products such as foundation or primer. These brushes are usually made of synthetic fibres, are flat and less full in form with an gentle taper.
How to use a flat foundation brush:
Guide the brush along your face in even strokes to achieve an even coverage. Ensure that the makeup is well blended and you can’t see any harsh lines. It’s always advisable to start from the middle of the face and work your way outward.
3. The Foundation Brush
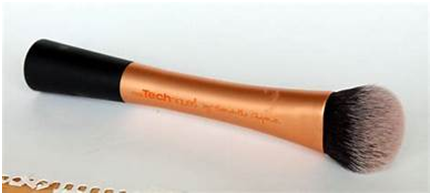
Using a foundation brush for your liquid or cream makeup is optional, you can also opt for either a sponge or your clean fingers instead. These brushes are typically very dense and full, and are either round or dome shaped. The bristles of foundation brush are normally made of synthetic fibres as they are easier to clean as well.
How to use a foundation brush:
For a perfect even foundation application, always start from the middle of your face, i.e. cheeks and T-zone and then blend your foundation outward in smooth and even strokes to prevent any harsh makeup lines.
4. The Stippling Brush

A stippling brush is known for its duo fibres, as the brush is packed with two different kinds and lengths of bristles. The bulk of brush is full fibred and are tightly packed at the base. These brushes are great for layering different levels of makeup. If you are looking for a softer foundation application or a more airbrushed effect, then the stippling brush is your go to brush. These brushes are ideal for applying tinted moisturizer, cream blushes and liquid highlighters.
How to use a stippling brush:
Put the cream blush or foundation on the back of your hand, then dip the brush into the product and gently swirl the bristles onto your face. Use the small motions to push the brush down onto your face. If you have a tendency to push hard the bristles into your skin, then hold the brush by the very end in order to have virtually no control over the brush. It’s all about gently blending the makeup.
5. The Kabuki Brush
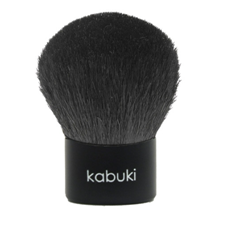
Kabuki brushes were made famous by Kabuki Japanese drama theatre. They come in large variety, with tightly packed fibres. They are usually used to apply loose powder or body shimmer in larger areas of the body and face. They are also good for powder foundation and blush application.
How to use a kabuki brush:
As the bristles of the Kabuki brush are really dense and firm, you just need a slight pressure for working the product into the skin. Just use the tip of the bristles to pick up the product and then gently swirl and buff to diffuse it across the face.
6. Blending Sponge
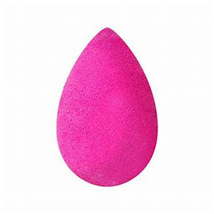
Blending sponge also known as the beauty blender are favourites with the professional makeup artist and makeup lovers. They can be used to apply a multitude of products ranging from primer, concealer and foundation and also helps in blending blush, bronzer and highlighter.
How to use a blending sponge:
A blending sponge works best when used damp. You need to run the sponge under the water and then press the sponge to squeeze out the excess. The water prevents the sponge from absorbing any of the makeup but helps in blending the makeup smoothly. Gently dab the sponge into the makeup product you are using and then apply the product to your face by using soft dabbing motions. Use the tip of the blending sponge for smaller areas like cupid bow, under the eyes and around the nose.
If you are already done with the makeup and the makeup is still looking patchy, then the best trick is to use the blending sponge and dab it all across the face to get a seamless blend.
7. The Concealer Brush
Concealer brushes are normally flat brush with a smaller brush head for spot treating on the face that need more coverage. These brushes are usually made of synthetic fibres.
How to use a concealer brush:
Dab the tip of the brush into a tiny amount of concealer or corrector and then gently pat the brush on the area where you need more coverage, like under your eyes or around your nose. After concealing the area, blend out the edges carefully so that the rest of the concealer does not get wiped away. Concealer brush can also be used to sharpen and cleaning up the messy eye makeup or feathered lipstick edges.
8. The Blush Brush
A blush brush is quite similar to a powdered brush. The only difference is that they are little stubbier as they are covering a smaller area than a powder brush. A good blush brush are the one with long fluffy bristles and a dome shape to evenly diffuse your powder pigments. The fluffier the brush is, the better it is, as it will pick less product and will give you a wash of colour.
How to use a blushbrush:
You can use the blush brush to apply both blush and bronzer. For blush, gently swirl the product on the apples of your cheeks and blend it up into your cheekbones. Bronzer can be applied the same way over the blush.
9. The Contour Brush
A contour brush comes in varied shapes and sizes. You can use a brush with blunt bristles and a sharp edge for a sharper sculpt, and softer slanted shape for a subtle definition. However, the angled contour brush is the most versatile as they allow you to follow the natural curves of your face. It helps in achieving the angular, defined cheekbones and facial structure.
How to use a contourbrush:
Swirl the contour brush into your contour powder, tap of the excess and then gently glide the brush just under your cheekbones to the hollow beneath the apples of your cheeks. For a more chiselled look, you can swirl the brush along your hairline and under your jawline. Contouring brush gives you a fine precision control over the angles of your face, with which you can achieve a Kardashian level contour.
10- The Highlighter Brush

A highlighter brush are of different shapes, and the shape of your highlighter brush totally depends on the level of glow you want. You can use a brush with very long bristles like a fan or a long tapered brush for a more diffused effect, or you can use a short brush with dense bristles for a super bright and opaque highlight.
How to use a highlighter brush:
Swirl your highlighter brush over a powder highlighter, always tap of the excess, and then lightly blend the brush over the high point of your cheekbones, brow bones, cupid’s bow and on the areas where else the light naturally hits your face. The tip to get a more intense highlighter is to take the product on your brush, spritz it first with a setting spray and then apply it on the high points of your face.
11- The Fan Brush
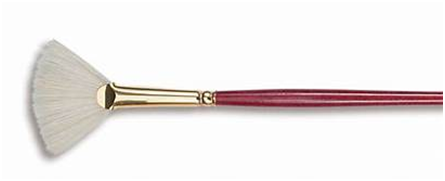
A fan brush is shaped like a fan and are a great basic to have in your makeup kit because of their multi use functionality. You can use this brush to dust powder highlighter along the cheekbones, or to lightly add the setting powder under your eyes before creating a heavy eye makeup look, once done you can dust away the fall out. They work exceptionally well as a mistake corrector. They can also be used to diffuse and blend out dark lines by fanning away the intensity.
How to use a fanbrush:
Take your fan brush and hold it flat and flush against your highlighter and coat the sides and tip of the bristles. In the case of fan brush, we actually use the side of the brush head rather than the tip of the bristles. Always tap the brush to get rid of the excess product, then sweep the brush upward along the top of your cheekbones towards your temple in a light swiping motion to create an almost airbrushed effect. You can also use it to brush underneath your eyes right after a messy eyeshadow application in order to clean up your under eye area.
12- The Eyeshadow Shader Brush
Aneye shadow shader brush is a flat shadow brush meant to transfer concentrated colour to the eyelids. It’s normally used to apply the base shadow. These brushes are typically flat but rounded at the tip and are quite dense so that they can pick up shadow really well for an opaque and even colour payoff on the lids.
How to use an eyeshadow shaderbrush:
You just need to dip the brush into the shadow and then tap off the excess and apply to the lids uniformly. Application of the base shadow should be in the pat or press motion and then gently swirl the brush around the edges to blend them out. For a more pigmented effect you can spritz the brush with a setting spray before applying it on the lids.
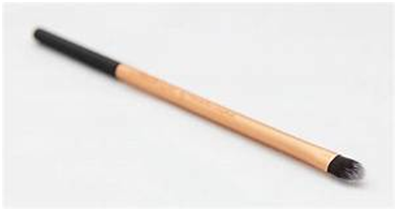
13- The Eyeshadow Blending Brush
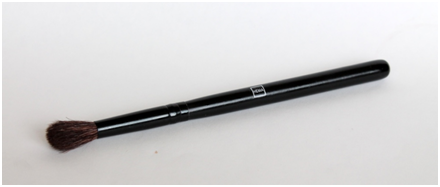
An eyeshadow blending brush helps you to get rid of harsh eyeshadow lines by blending, buffing and diffusing the colour with the help of its long and fluffy bristles. These brushes are normally known for their tapered shape and, soft and fluffy bristles. Unlike the shader brush which is used to pack the shadow on your lids, an eyeshadow blending brush is used to blend the shadow for a really sheer and diffused finish.
How to use an eyeshadow blendingbrush:
Swipe an eyeshadow blending brush into the crease of your lids either in a circular or a windshield-wiper motion to diffuse your eyeshadow. Swirl it around the edges of youreyes when want to blend multiple shaded on top of one another.
14- The Pencil Brush
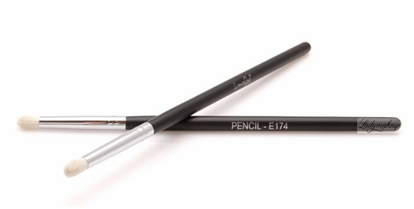
A pencil brush is a stiff, dense and tapered brush. It helps you in smudging out the cream eyeliner, adding shadow to the line of the eyes, and to highlight the inner corner of the eyes. It basically softens and smokes out the lines.
How to use a pencilbrush:
Once you have applied the pencil eyeliner, use the pointed tip of the pencil brush to gently smudge it out. You can also use the tip to smoke out an eyeshadow underneath your bottom lashes.
15- The Eyebrow Brush
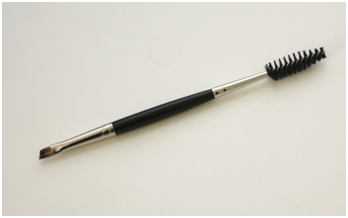
An eyebrow brush is used for taming and styling your brows. Normally the brow brush are double sided, one side is a spoolie and the other is the brush side. The brush has a flat, blunt and angled bristles to help you fill in your brows in soft hair strokes using either a brow gel, cream or powder. Spoolie on the other side of the brush is used to comb and tame the eyebrow hair and to disperse the product evenly.
How to use an eyebrowbrush:
Use the firm and angled bristles of the eyebrow brush to fill in the gaps of your brows in soft hair strokes with an eyebrow product, then comb through your brows with the spoolie to soften the colour and disperse it. Never fill in your brows with too much product. Follow the natural shape of your brows rather them making them into unnatural forms.
16- The Eyeliner Brush
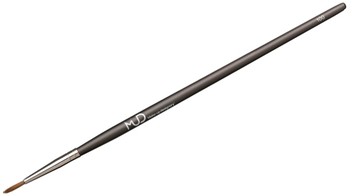
An eyeliner brushallows you to precisely apply the colour around the eyes. They help to create smooth and even lines. You can use it with gel or liquid liners.
How to use an eyelinerbrush:
To use an eyeliner brush, dip it into the liner pot and starting from your inner eye draw a line outward while gradually increasing the width of it and flicking it towards the end. It required practice to make it perfect. The key to eyeliner application is steady hands.
You can also start your eyeliner application by dotting the lash line. Use the eyeliner brush to make small dots along your lash line and then connect the dots to get that perfect winged liner. You can also use stencil or tape to make sure that the angles of the wings match.
17- The Lip Brush
A lip brush is used to precisely apply lipstick, gloss and other lip products. This brush has a finer tip to reach the curves of your lips and fill it properly.
How to use a lipbrush:
Dip the lip brush into your lip product and apply directly to your lips.
Cleansing the makeup brushes:
It’s important to sanitize and wash your makeup brushes after every use to avoid any infections or rashes by using dirty brushes. Use a mild shampoo to wash your brushes. Wet the bristles of the brush, but avoid getting water on the handles, then swirl the brush on a brush egg to remove the dirt and the soap from the bristles. Let the brush air dry to maintain and preserve their shape. Never dry your brushes with a hair dryer as it will cause the hairs to melt and will result in a short life line, distorted and uneven brush.
The right set of makeup brushes and the knowledge of using them properly can elevate your beauty game. We at Brush Up By Vanshika hope that this article will help you to know your makeup brushes better.